2017年10月25日 星期三

自動化設備PC程式參數檔案架構介紹與改進(四)

     生產中設備,刻不容緩,尤其是在整條產線時,說出口 :『等我改一下』,如果沒馬上改好,就得承受許多的壓力 :


  • 下一站的同事 : 欸~你還要多久才可以過站?要不我先去尿尿?(流線式生產線,某一站停了,工件就無法到下一站)
  • 設備工程師 : 你們港~塊~要量產了!!!!
  • 設備工程師經理 : 不發一語的眼神怒視攻擊~~~
  • 操作設備的阿姨 : 你這樣我很難用,你不能加OOXX#$%功能嗎?
  • (最爽的)上一站的同事 : 你加油~我去尿尿了。(跑去納涼)

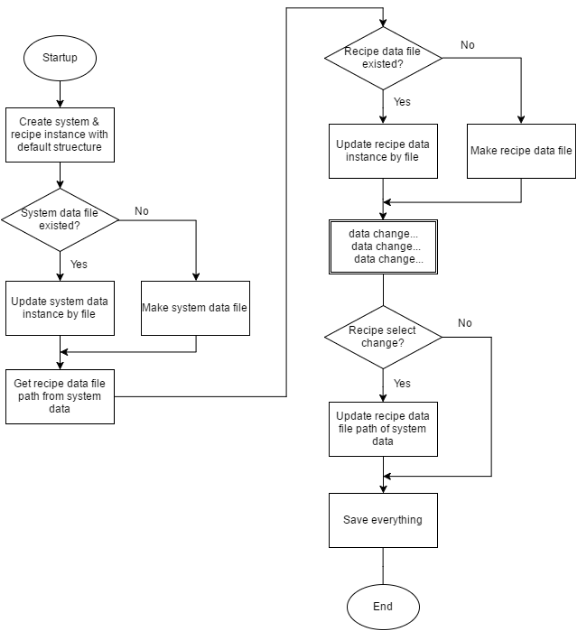
     為了盡量減少面對這樣的壓力,並快速地增刪參數(改功能通常都會有參數變動),我寫了一些關於參數檔的通用程式,到目前為止,也應用在許多不同的設備上了。

以下將以範例方式介紹GeneralArgumentDialog相關功能 (下載範例)

1. 解壓縮範例後,打開TestGeneralArgumentDialog方案(base on vs2013 & .Net framework4),會看到如下圖,各類別說明如圖所示:

2. TestGeneralArgumentDialog是主要的測試專案(起始專案),另外一個就是參考的專案,如果要採用此參數檔案架構,可以直接引用此專案(GeneralArgumentDialog)或是build成dll來用。


3. 編譯完成後直接執行程式,可以看到如下圖的範例程式:
     *分頁General Argument Tool Test: 直接存讀檔與ArgumentDialog操作演示

     *分頁Property Grid Sample: 自訂類別的屬性參數演示,以及其他特性測試。

4. 經過泛型化的XML讀寫fun已經被簡化為以下:
       
1
2
3
4
private void btnWriteToXml_Click(object sender , EventArgs e)
{
     ArgumentBase.WriteToXml(Lib.GetUserDir() + @"\DataThree.xml" , dataThree);
}

------------------------------------------------------------------------------------------------------------

  
1
2
3
4
private void btnReadFromXml_Click(object sender , EventArgs e)
{
    dataThree = ArgumentBase.ReadFromXml<DataThree>(Lib.GetUserDir() + @"\DataThree.xml");
}
------------------------------------------------------------------------------------------------------------


5. 透過ArgumentDialog操作/顯示屬性類別實體的操作 (觀察Class Instance即時修改資料)

code:
1
2
3
4
5
6
7
8
private void btnShowDialogSave_Click(object sender , EventArgs e)
{
    DataThree tmp = ArgumentBase.ShowDialog(dataThree , "Data Three" , 5 , dataThreeFilePath);
    if (tmp != null)
    {
        dataThree = tmp;
    }
}
dialog: (此時以dialog打開自訂屬性類別,Apply後Instace會寫入dataThreeFilePath路徑)
------------------------------------------------------------------------------------------------------------


code:
1
2
3
4
5
6
7
8
private void btnShowDialogSaveAs_Click(object sender , EventArgs e)
{
    DataThree tmp = ArgumentBase.ShowDialog(dataThree , "Data Three" , 5 , ref dataThreeFilePath);
    if (tmp != null)
    {
        dataThree = tmp;
    }
}
dialog: (此時增加Saveas與Open按鈕,可以在執行期間選取讀取\寫入檔案)
------------------------------------------------------------------------------------------------------------


code:
1
2
3
4
5
private void btnShowDialogEditor_Click(object sender , EventArgs e)
{
    //即時修改instance-不存檔
    ArgumentBase.Show<DataThree>(dataThree , "Data Three" , 5);
}
dialog: (此時dialog即時修改instance,不需要按apply)
------------------------------------------------------------------------------------------------------------


code:
1
2
3
4
5
private void btnShowDialogViewer_Click(object sender , EventArgs e)
{
    //純顯示
    ArgumentBase.Viewer<DataThree>(dataThree , "Data Three" , 5);
}
dialog: (此時dialog只顯示數值,無法做任何修改)

........
......
....
.
恩.....
經過三小時才編好上述文章,這樣太了,我決定偷懶用錄影的!!!
     影片1: (範例程式)
    會用到的功能大多寫在按鈕上了,特性用法也標在屬性類別上了,就不在文章贅述了。

     影片2: (新增參數的方式)
     只要在參數類別中直接新增屬性,在GeneralArgumentDialog就會自動新增,同時也有檔案讀寫功能,是不是相當方便呢!?


結語:
本系列文章就到此結束了,看了一下紀錄,居然寫了一年多,好吧,就是偷懶的結果。不過也為了這次寫blog,把原有的程式碼做了整理,才發現有許多不合理處,現在也才知道,自己會寫是一回事,要寫成文章教學,又是另一回事。

2017年5月22日 星期一

顯示滑鼠指定位置的灰階值 Grey value (Cognex)

因專案需求,要顯示滑鼠指定位置的Grey Value,一開始想得很簡單,忽略了Cognex display控制項的Pan & Zoom會讓圖片位置與大小比例改變,導致滑鼠指不到對的位置上,花了一些時間把忽略的因素考慮進去後,得到以下程式碼:

程式概要說明:
1. 採用Cognex 的Display控制項的Mouse_Move事件
2. ICogImage.GetPixel(int x, int y) 可以直接取得指定XY位置的灰階值
3. zoomImgHeight , zoomImgWidth 是image經過zoom的實際寬高
4. blankWidth , blankHeight 是指當image和display比例不同時,在Display控制項周圍留白(藍底)的寬高
5. scaleWidth , scaleHeight 是縮放過後的image與實際image的寬高比例
6. scalePointX , scalePointY 是指MouseMove的XY經過比例換算後的位置(考慮留白區)
7. realPointX , realPointY 是指scalePointXY經過Display的Pan的偏移後的真實滑鼠指在image的位置

 1
 2
 3
 4
 5
 6
 7
 8
 9
10
11
12
13
14
15
16
17
18
private void cogRecordDisplay_MouseMove(object sender , MouseEventArgs e)
{
    decimal zoomImgHeight = (decimal)cogRecordDisplay.Image.Height * (decimal)cogRecordDisplay.Zoom;
    decimal zoomImgWidth = (decimal)cogRecordDisplay.Image.Width * (decimal)cogRecordDisplay.Zoom;

    decimal blankWidth = ((decimal)cogRecordDisplay.Width - zoomImgWidth) / 2;
    decimal blankHeight = ((decimal)cogRecordDisplay.Height - zoomImgHeight) / 2;

    decimal scaleWidth = (decimal)cogRecordDisplay.Image.Width / zoomImgWidth;
    decimal scaleHeight = (decimal)cogRecordDisplay.Image.Height / zoomImgHeight;

    decimal scalePointX = Math.Round((e.X - blankWidth) * scaleWidth , MidpointRounding.AwayFromZero);
    decimal scalePointY = Math.Round((e.Y - blankHeight) * scaleHeight , MidpointRounding.AwayFromZero);

    decimal realPointX = scalePointX - (decimal)cogRecordDisplay.PanX;
    decimal realPointY = scalePointY - (decimal)cogRecordDisplay.PanY;
    tsslGreyValue.Text = ((CogImage8Grey)cogRecordDisplay.Image).GetPixel(Convert.ToInt32(realPointX) , Convert.ToInt32(realPointY)).ToString();
}

2016年7月18日 星期一

自動化設備PC程式參數檔案架構介紹與改進(三)

     PropertyGrid 是一個.Net很方便的控制項,可以顯示Instance中公開的屬性,基本的使用方式就不多著墨了,直接探討在應用上面臨的問題:
  • PropertyGrid只是一個控制項,要讓它像Form可以Show出來。
  • 要有按鈕與User交互(Save, Save as, Accept, Close)
  • 要能用選擇檔案(OpenFileDialog)/目錄(FolderBrowserDialog)的方式設定參數。
  • 基本數值型別可以直接放到PropertyGrid顯示/修改,而自訂型別需要另外處理。
  • 依照不同權限,在PropertyGrid中顯示不同的參數。
先簡述一下如何解決上述問題,首先必須先提到『依照權限顯示參數項目』功能,因為需要有隱藏項目功能的PropertyGrid作為核心控制項,此處參考Code Project中的Filtering properties in a PropertyGrid,把Filter Property Grid拉到Form中,並做一些交互的功能設計(如下圖),之後就會以這個Form作為參數類別的容器與使用者交互。


要能在PropertyGrid中選擇目錄和檔案(下兩圖),雖然FilePath和Folder都是字串型別而已,但總不能要使用者自己手打路徑吧,其實只要在參數上標示特性(Attribute)即可達成,相當容易,參考以下。
// 以FileNameEditor編輯字串,用來選檔案。
[EditorAttribute(typeof(System.Windows.Forms.Design.FileNameEditor) , typeof(System.Drawing.Design.UITypeEditor))]
public string FilePath { get; set; }


// 以FolderNameEditor編輯字串,用來選目錄。
[EditorAttribute(typeof(System.Windows.Forms.Design.FolderNameEditor) , typeof(System.Drawing.Design.UITypeEditor))]
public string Folder { get; set; }

在PropertyGrid中顯示自訂型別(如下圖),這部份比較麻煩一點,自訂類別要繼承ExpandableObjectConverter,然後override CanConvertTo、ConvertTo、CanConvertFrom三個方法,參考以下範例,自訂PointXYZ類別:
public class PointXYZ : ExpandableObjectConverter
{
    public double X { set; get; }
    public double Y { set; get; }
    public double Z { set; get; }

    public PointXYZ()
    {
        X = 0;
        Y = 0;
        Z = 0;
    }

    public PointXYZ(double x , double y , double z)
    {
        X = x;
        Y = y;
        Z = z;
    }

    public override bool CanConvertTo(ITypeDescriptorContext context ,System.Type destinationType)
    {

        if (destinationType == typeof(PointXYZ))
            return true;
        return base.CanConvertTo(context , destinationType);
    }

    public override object ConvertTo(ITypeDescriptorContext context ,
                           CultureInfo culture ,
                           object value ,
                           System.Type destinationType)
    {
        if (destinationType == typeof(System.String) && value is PointXYZ)
        {
            PointXYZ p = (PointXYZ)value;
            return "X:" + p.X +
                   ",Y:" + p.Y +
                   ",Z:" + p.Z;
        }
        return base.ConvertTo(context , culture , value , destinationType);
    }
    public override bool CanConvertFrom(ITypeDescriptorContext context ,
                          System.Type sourceType)
    {
        if (sourceType == typeof(string))
            return true;
        return base.CanConvertFrom(context , sourceType);
    }
}

最後在類別參數標示特性(Attribute) TypeConverterAttribute:
[TypeConverterAttribute(typeof(PointXYZ))]
public PointXYZ SomePoint { get; set; }
詳細作法可以參考MSDN的文章Getting the Most Out of the .NET Framework PropertyGrid Control 中Support for Custom Types章節。


回到依照權限顯示不同項目的功能上,首先要自訂一個特性PermissionsAttribute : Attribute,有需要依照權限隱藏的項目標示特性如下:
[Permissions(2)]
public string Info { get; set; }
在打開參數容器時,需要定義容器權限值,當容器權限小於參數定義的權限特性值時,該參數就會被隱藏,參考以下參數容器程式片段:
PropertyInfo[] piObj = inputObject.GetType().GetProperties(BindingFlags.Instance | BindingFlags.Public);
foreach (var eachItem in piObj)
{
     PermissionsAttribute attPermission = (PermissionsAttribute)Attribute.GetCustomAttribute(eachItem , typeof(PermissionsAttribute));
     if (attPermission != null)
     {
          if (permission < attPermission.Value)
          {
               hiddenProperties.Add(eachItem.Name);
          }
     }
}
this.filteredPropertyGrid.SelectedObject = inputObject;
this.filteredPropertyGrid.HiddenProperties = hiddenProperties.ToArray();
this.filteredPropertyGrid.Refresh();
上述針對應用面的問題提出解法,並整合了許多網路資源來達到目標,除了本文提到的用法之外,在Getting the Most Out of the .NET Framework PropertyGrid Control文章中也有許多常用的用法,下篇文章將會以範例的方式介紹本文的程式用法。

2016年6月4日 星期六

自動化設備PC程式參數檔案架構介紹與改進(二)

瞭解INI參數架構的問題靠北後,本篇文章將以序列化為主題,在這之前重述一下具體的需求:
難道不能直接改參數類別(Class),就對應到參數檔(xml)嗎?不想逐步修改loadIniFile()、saveIniFile()內容』是的,我們可以靠序列化(Serialization)達成,參考MSDN文章得知:
序列化是將物件(Object)轉換為位元組資料流(Stream of bytes)的一種處理程序,以便將其儲存或傳輸至記憶體、資料庫或檔案。主要目的是要儲存物件的狀態,以便能在需要時重新建立該物件。此回復程序稱為還原序列化 (Deserialization)。

上述的”物件”我們直接當成參數類別的實體(Instance),是以整個物件做序列化,不需要針對物件中的個別參數寫檔案,或是讀檔案後一一寫到參數。對應我們的目標,流程可以簡述如下:

  • 序列化 : 物件 -> 位元資料流 -> 存檔
  • 反序列化 : 讀檔 -> 位元資料流 -> 物件
除了MSDN相關文章,隨便問一下谷哥”序列化”,可以得到一海票的相關文章,身為一個優秀的碼猴,乖乖地吃香蕉K完這些文章並測試後,驚覺事情沒有這麼單純,還是有以下事項要注意:
  • 存檔文件的可讀性:
  • 序列化方式不只有一種,可以選用XML序列化,讓文檔具有可讀性。
  • 程式寫法解耦:
  • 單說解耦有點抽象,但其實就是要把功能寫成通用、獨立的函式,目標是用一個函式把物件序列化為文件,和一個函式反序列化文件為物件。
  • 類別和屬性的標籤簡化:
  • 要序列化的類別和屬性通常都要標示[Serializable()]之類的特性,但都已經建立專屬的參數類別了,本來就要把整個類別序列化,標示特性的動作還是有點瑣碎。
反覆測試後決定採用DataContractSerializer而不是XmlSerializer,有興趣可以看看這兩種XML序列化的比較,以及DataContractSerializer不標示特性的影響,最後用泛型讓函式可以支援多種物件,並且將檔案路徑參數化,參考以下程式碼:
//將物件序列化為檔案
public static void WriteToXml<T>(string fullFileName , T instance)
{
    FileStream writer = null;
    string directory = Path.GetDirectoryName(fullFileName);
    if (!Directory.Exists(directory))
    {
        Directory.CreateDirectory(directory);
    }
    try
    {
        writer = new FileStream(fullFileName , FileMode.Create);
        DataContractSerializer ser = new DataContractSerializer(instance.GetType());
        ser.WriteObject(writer , instance);
        writer.Close();
    }
    catch (Exception ex)
    {
        if (writer != null)
        {
            writer.Close();
        }
        throw new Exception(ex.Message);
    }
}

//反序列化檔案為物件
public static T ReadFromXml<T>(string fullFileName)
{
    FileStream fs = null;
    try
    {
        fs = new FileStream(fullFileName , FileMode.Open);
        DataContractSerializer ser = new DataContractSerializer(typeof(T));
        T deserializedData = (T)ser.ReadObject(fs);
        fs.Close();
        return deserializedData;
    }
    catch (Exception ex)
    {
        if (fs != null)
        {
            fs.Close();
        }
        throw new Exception(ex.Message);
    }
}

範例下載

2016/07/04 補充: 參數類別一定要是『public』且有『預設建構式』

2016年5月17日 星期二

自動化設備PC程式參數檔案架構介紹與改進(一)

不想看廢話,直接看最後範例

在自動化設備的程式中,一定會有參數檔案的運用,通常分為以下兩種:

系統參數(System Data) : 指打開程式後,程式要恢復的狀態(ex : 上次程式關閉前選擇的工單、語系…)。
工單參數(Recipe Data) : 指某一類產品的加工(製程)參數,藉著選擇不同工單,讓設備採用不同的製程參數加工。

實作在系統中的流程如下圖,比較需要注意有以下幾點:
1. System data的檔案路徑是唯一的,通常會在程式定好一個檔案路徑。
2. 注意參數初始值的問題。 Ex: 數值型別預設值是0,新增recipe時,會得到一堆數值為0的欄位。
3. 在System data中定義一個string參數 ,儲存當前recipe data的file path。(*1)
4. 文字型別轉型為數值型別時的例外處理參數設定頁面的控制項防呆
(*1) 採用Recipe data 的file path是因為recipe system基於windows 的file system,
如果有另外寫自己的recipe system, 也有可能是recipe的index,
不過既然是windows base的系統,採用檔案路徑會比較直覺。

說明完程式架構,來看看參數檔的樣子,最常見的格式就是ini檔,格式如下:

通常會用Win32API (WritePrivateProfileString、GetPrivateProfileString)去讀,細節就不實作了,最後大概都會寫成以下的func。

//取得值:
string GetKeyValue(string section, string key)
//設定值:
void SetKeyValue(string section, string key, string value)

使用方式如下:
//初始化
IniFile ini = new IniFile(@"C:\Data.ini");
//取值
string val = ini.GetKeyVaule("Section2","key1"); //val = value1
//寫值
ini.SetKeyValue("Section2","key2","NewValue"); // ini 的section2的key2會變成 NewValue


實作一開始的流程圖,在win form的程式中大概會長以下這樣。(為求簡潔先省略轉型例外處理,另外本文主旨是參數檔案架構,所以並沒有實作Recipe system,一般會另外寫程式來增刪改查Recipe清單,日後會在寫一篇文章介紹Recipe system)
public partial class Form1 : Form
{
    private string systemDataFilePath;
    private IniSystem iniSystem;
    public SystemData SystemData { get; set; }
    public RecipeData RecipeData { get; set; }
 
    public Form1()
    {
        InitializeComponent();
    }
 
    private void Form1_Load(object sender , EventArgs e)
    {
        systemDataFilePath = @"C:\System\System.ini";
        SystemData = new SystemData();
        RecipeData = new RecipeData();
        loadIniFile();
    }
 
    private void Form1_FormClosing(object sender , FormClosingEventArgs e)
    {
        saveIniFile();
    }
 
    private void saveIniFile()
    {
        iniSystem = new IniSystem(SystemData.RecipeFilePath);
        iniSystem.SetKeyValue("Recipe" , "Speed" , RecipeData.Speed.ToString());
        iniSystem.SetKeyValue("Recipe" , "Acc" , RecipeData.Acc.ToString());
        iniSystem.SetKeyValue("Recipe" , "Dec" , RecipeData.Dec.ToString());
        iniSystem = new IniSystem(systemDataFilePath);
        iniSystem.SetKeyValue("System" , "RecipeFilePath" , RecipeData.Speed.ToString());
        iniSystem.SetKeyValue("System" , "Data1" , RecipeData.Acc.ToString());
    }
 
    private void loadIniFile()
    {
        if (File.Exists(systemDataFilePath))
        {
            //讀取系統參數
            iniSystem = new IniSystem(systemDataFilePath);
            SystemData.Language = iniSystem.GetKeyValue("System" , "Language");
            SystemData.RecipeFilePath = iniSystem.GetKeyValue("System" , "RecipeFilePath");
 
            if (File.Exists(systemDataFilePath))
            {
                //讀取工單參數
                iniSystem = new IniSystem(SystemData.RecipeFilePath);
                RecipeData.Speed = Convert.ToDouble(iniSystem.GetKeyValue("Recipe" , "Speed"));
                RecipeData.Acc = Convert.ToDouble(iniSystem.GetKeyValue("Recipe" , "Acc"));
                RecipeData.Dec = Convert.ToDouble(iniSystem.GetKeyValue("Recipe" , "Dec"));
            }
            else
            {
                //create recipe data file with default vaule
            }
        }
        else
        {
            //create system data file with default vaule
        }
    }
 
    private void recipeChange(string path)
    {
        SystemData.RecipeFilePath = path;
    }
 
    private void refreshControls()
    {
        //通常會在winform上建立一些控制項去改變recipe or system data的數值
        //為了文件簡潔先省略實作
    }
}

上面程式簡單實作了文章開頭的架構圖,看起來似乎沒有什麼問題,其實魔鬼藏在細節,想當初剛接手設備時也是身受其害,接著就來說說缺點:

1. 新增或刪除參數時,必須逐一修改loadIniFile()、saveIniFile()中對應的程式碼。
2. 如果參數非字串型別,從ini file讀回時,必須一一處理轉型問題
3. 新增或刪除參數時,必須修改在Winform參數頁面的layout對應。
4. 如果參數是自訂型別,必須把實體內層參數提取出來。
5. 無法簡單的處理集合資料,必須一筆一筆資料讀寫。
6. 參數讀寫與控制高度耦合在Winform之中。

第1-3點非常擾人,當設備是處於測試階段時,參數通常都會變來變去,所以要一直去改這些程式碼,只要一個地方沒改好就沒辦法馬上測試,當設備是跟旁人協作時,旁人這時就會發起注視攻擊,一邊問『還要多久?』,菜鳥內心應該感到無限靠北感慨。

第3點是當原有的參數設定畫面放不下新的控制項時,若要求介面美觀,必須得一個一個元件去修改layout,這也相當耗費時間,通常都會先隨便拉個介面應急,採取迴避大法說:『這個我要回去改一下』,然後回辦公室邊吃香蕉邊改介面。

第4 5點不一定會遇到,但既然是物件導向的語言,自訂class是很常有的,如果想要以自訂class作為參數型別,在撰寫讀寫部份程式碼時,過程冗長又容易出錯,第5點同4。

第6點是前五點的結論,在簡單的小程式中做上述操作不會太難,吃根香蕉認真地做個碼猴,施展Ctrl+C – V大法,再稍微修修剪剪一下很快就可以完成XD。但…我想簡單的小程式這種東西應該不會存在自動化設備中…

提出這麼多缺點靠北後,來分析一下問題(吃太多香蕉):

1. 讀取\寫入檔案一定要這樣一個一個刷物件裡的變數嗎?
2. 基本型別的參數不能自己轉型成對應的型別嗎?
3. 修改參數的介面一定得一個一個拉嗎?

終於到本文的末段了,好不容易才引出這三道題目,那要怎麼解決這些問題呢?查了一下發現序列化可以簡單的解決上述1和2的問題,參考黑大的文章,從下圖可得知,只要把黑大範例中的bigList換成參數實體SystemData、RecipeData就可以依樣畫葫蘆,整個instance序列化與反序列化並且存讀檔,完美避開要刷參數與參數轉型問題。

那第三個問題又要怎麼解決呢?每台設備的參數通常都不會一樣,根本無法統一成一個介面,最後也是避免不了對UI修修改改,其實visual studio已經告訴我們答案,參考下圖,很眼熟吧!這是在VS中控制項的屬性頁,每當你選到不同控制項時,畫面就會變成對應的變數,其實這就是Property Grid,如果我們以Property Grid作為設定參數的頁面,那就算變更參數也不需要再去維護介面了。

這邊先小結一下,所以只要透過序列化加上以PropertyGrid作為參數設定頁面,就可以避免採用Ini與不斷修改參數設定頁面的種種不便,從此每天準時下班享受幸福人生。呃!事情當然沒有這麼理想,雖然解決了上述繁瑣的操作,但也有一些待解決的問題與侷限在,首先序列化與反序列化部份要支援泛型才能寫成函式庫使用,其二設定參數的介面也還是要跟User交互,並不是拉個Property Grid就可以下課,下篇文章將會進一步說明這些細節。

2014年1月31日 星期五

C# 程式設計規範

為了讓Programer之間有更好的交流,一般都會定義程式的粗規範,小弟有幸進到一間沒規範的公司(@#!%$#OOXX),因此寫了篇規範。其中比較常被同事拿出來討論的問題,『究竟private成員是否要在名稱前加上底線?』,目的是為了快速找到自定義的成員(如下圖),只是我覺得這樣寫起來程式不好看,所以比較少用就是了。(那個自動跑出來的框框叫什麼阿?)


C# 程式設計規範 PTT File

Visual Studio 常用熱鍵表

Visual Studio有許多熱鍵,為了方便參考,將熱鍵分為「編輯」、「建置」、「偵錯」三類做成一張圖片。